Usually events are used to sell tickets. Of course, Eventchamp offers you a structure that allows both ticket sales and event promotion without selling tickets. You can learn about both in this article.
Before you start, it’s good to know that you must have created your event before creating a ticket, or you can create a ticket while creating a new event.
That’s why we skip the event creation step, you can read the event creation article here.
Step 1 – Go the Events > All Events.
Step 2 – Click on the event for which you want to create tickets.
Step 3 – Locate the ‘Event Details’.
Step 4 – Open the ‘Tickets’ section.
Step 5 – You can enter a main price in the ‘Price’ field. This price will show on event listing elements and it uses in the event search system.
Step 6 – Click on the ‘Add New’ button from the ‘Tickets’ field.
Step 7 – Fill in the fields below.
- Title: You can enter a title for the ticket.
- Subtitle: You can enter a subtitle for the ticket.
- Package Features: You can enter ticket details.
Step 8 – If you have more than one ticket, if you want to highlight one or more of them, select ‘On’ in the ‘Active’ field.
Step 9 – Concentrate on this step and read carefully. At this step, you can add a payment option to your ticket, a contact form or a link to the ticket detail page. You will see ‘Purchase Type’ field. The following options are available in this field:
- WooCommerce: You can sell tickets online via WooCommerce.
- Eventbrite: You can redirect the ticket to the Eventbrite page.
- Meetup: You can redirect the ticket to the Meetup page.
- Contact Form: For offline sales or those who want to get information, you can direct them to the contact form.
- External Link: You can redirect to an external website or to a page on your own site.
WooCommerce / Online Ticket Sales
Choose the ‘WooCommerce’ option from the ‘Purchase Type’ field. The ‘WooCommerce Product’ field will open. Select a WooCommerce product for this ticket. This product will be added to the cart when the buy now button is clicked and customers will buy the ticket with this product. The ticket price will come from this product.

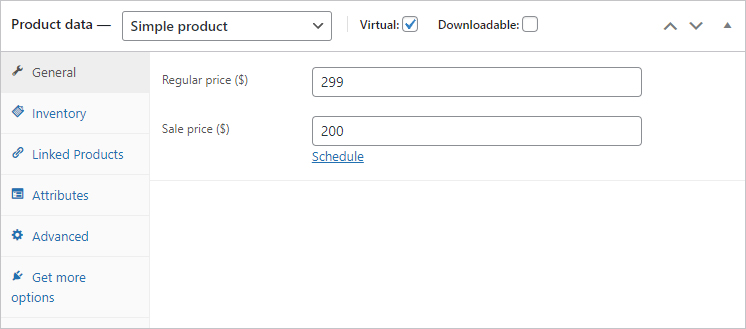
To sell tickets with WooCommerce, you first need to own a WooCommerce product. Navigate to Product > All Producs. Create a WooCommerce product. You will sell tickets online, I recommend creating a virtual product. You need to create this product before creating a ticket so that it appears on this page, or you can save the changes and refresh the page.
Select the status of the quantity selection feature from the ‘Quantity’ field. If you want users to purchase multiple tickets, select the ‘Show’ option from the ‘Quantity’ field.
Eventbrite, Meetup and External Link
When you choose one of these options, a URL entry field will open. Simply enter the link of the page you want to redirect.
Contact Form
When you select this option, a URL entry field will appear for you to redirect to the page with the contact page. If you enter the URL field blank, clicking the button on the ticket will open a contact form on the event page without redirecting to any page.
You can edit this contact form from the theme options. Navigate to the Theme Options from WordPress dasboard. Open the Events section. You will see a ‘Contact Form Shortcode’ field. You can enter a contact form shortcode for the contact form in the event details. You can use any contact form plugin. We recommend Contact Form 7 plugin. An example shortcode: [contact-form-7 id=”123″] This event form will be used in all events.
Step 10 – You can enter a ticket price from the ‘Price’ field. Only enter a price, do not enter any price symbol. Example: 50. Blank enter it, if you use WooCommerce product for this ticket. If you are using a WooCommerce product, the ticket price will come from this product automatically.
Step 11 – Finally, you can create a button. Enter a button text from the ‘Button Title’ field and choose a target from the ‘Button Target’ field.
If you are using a WooCommerce product, clicking the button will automatically add that product in the cart.
If you are using other options (Eventbrite, Meetup, External Link or Contact Form), clicking this button will direct you to the links you specify.
Step 12 – Now your ticket is ready! You can save or update the page.


